Showing posts with label DIY. Show all posts

Tuesday, May 7, 2013

A Porch Earns its Stripes


Recently, the weather in NY has been beautiful.  With warmer temperatures approaching a few weeks ago, we were itching to set up our porch.  The problem was that it didn't look so nice.

 Before                      

We had a mix of hand-me-down pieces, yard sale finds, and two new chairs.  Nothing seemed to go together.  The solution - give everything a fresh coat of paint!  It's an inexpensive an easy way to unify miss matched furniture.  We went with a really glossy black for the sofa.  Because it was rattan and had many small crevices, painting it was a labor of love!  The table was much easier because of it's smooth surfaces.  If you're going to try this yourself, we recommend putting a few coats of poly on any porch furniture that's not technically made for the outdoors.  Applying this after you paint it will help protect the paint job in harsher climates.  Moving it inside during the winter is not a bad idea either.

After

We also had new covers made for the cushions on the sofa and chairs.  We were inspired by the stripes on these porches below.  We love the elegant but bold black and white stripe and the fact that it's easy to mix with other colors and patterns.  We started with an indoor/outdoor pillow and a bright green candlestick.  I'm sure we'll find some more outdoor accessories soon!


Monday, April 8, 2013

Welcome to our new home!


So we finally have a new blog post for you. Sorry we've been away for a while, but I think (hope) you'll be happy with the reason why - we've been working on several projects. As we promised, here is an update on some of the work we've done at home. 

We had this atrocious entry hall (sorry whoever was here before us). An entry hall should welcome your guests and give them a hint of what to expect within your home. Our entry hall had this linoleum floor that felt . . . well, cheap. It wasn't welcoming and I HOPE it didn't give anyone a hint of what to expect inside the rest of our home. 


We couldn't take up the linoleum so we had to figure out a way to cover it up.  A simple throw rug wouldn't do it for us, because we didn't want to see even the slightest hint of linoleum peeping out from under it.  Also, see if YOU could find a throw rug that would make this floor look good!  We decided to look at Flor carpet tiles.  It is a high traffic area and we knew if a tile got dirty we could either lift it up to clean it or replace it if it was beyond hope.  We ended up selecting the "Fedora" style in flannel and charcoal. At $8 a square it wasn't bad.  We signed up for their emails and also got free shipping, which saved us a ton of money.

Our original idea was to alternate tiles to create stripes.  However, when the tiles arrived we realized that each square was so big that we would end up with a total of just three stripes across the entry way.  That wasn't going to have the impact we wanted, so we decided to cut the tiles in half.  This was a labor of love!  Matthew found instructions on cutting carpet tile on Apartment Therapy.  You can read the step-by-step instructions here.  We also invested a carpet knife and a t-square, and we highly recommend these tools.  The results were great.  While not overly difficult it wasn't easy either.  It took a lot of measuring and careful cutting to get the tiles to line up correctly.  Matthew's lack of patience the carpet knife also caused a minor injury, so we recommend being very careful with this tool!


Notice those stripes on the wall?  We actually color matched them and aligned them to the strips on the carpet tiles, but we'll tell you all about that in another post.  Now we have an entry that is inviting and accurately reflects our style.


Sunday, March 17, 2013

No-Sew Sink Skirt Revisited


About a year ago we wrote a post about a DIY no-sew sink skirt.  You can read about it here.  It was a big success: it added some much needed color and pattern to a bland bathroom that we didn't want to paint and it held up over time.  Since then we have moved into a new house, and we gained a new bathroom to tackle.


below: sink from last year

There were a few issues here, and we're tackling them one by one.  The deep red color of the bathroom seemed oppressive in such a small space.  We started by lightening it up with a coat of light grey paint.  The previous tenants left us this little side table, which was made to fit in the space.  We painted that too, and it adds some storage but not enough.  Having the toilet brush and bowl cleaner just hanging out in plain sight under the sink did not work for me.


Before

So, I got inspired by last year's project. Unfortunately, the sink in our last bathroom was a completely different size, so I couldn't reuse the skirt with the beautiful Roberta Roller Rabbit print.  I took it as an opportunity to try something new.  I followed the same steps as last time.  You can read those here on Little Green Notebook.  I did everything the same, except I decided to add ribbon on the bottom of the skirt.


I didn't do a print this time because we have another plan for that room that involves a geo pattern.  More to come on that later!  (You might see a hint of what's to come in the reflection in the mirror.)  I also repainted the faux bamboo mirror that I found at a yard sale for $20.  I used Citron paint in gloss from Benjamin Moore after adding two coats of Kilz oil based spray primer.  Not bad for an inexpensive project!


                 Before                                                       After                       


Tuesday, January 22, 2013

Tacky Light Tour


Well the holiday season came to an end a while ago, but as you all know, it's been kind of crazy around here at next summer. I'm finally making some time to fill you in on one of the coolest things we did while down in Richmond, Virginia for Christmas. For years now I've been hearing about Richmond's Tacky Light Tour. I've even seen it several times on TV. This year would be my first Christmas in Richmond with Lindsay's family. We were damned sure going on that Tacky Light Tour. 

This is a tour around the city and its suburbs to see all the INCREDIBLE tacky light displays. Let me just tell you this, they do it RIGHT down there. 


Lindsay and I took a break from the tour to get our photo taken in front of one of our "favorite" houses. 


I'm sure the Electric companies LOVE this tour!


Not a square inch is left unlit!


This house is just to the left of the house in the previous photograph. It's hard to tell in this picture, but the signs say, "What's the point?" and "Ditto". The arrow points to the house up above. 


At the end of the tour we stopped to see Santa's Car. Love it!

Wednesday, December 12, 2012

TRADITIONS: COOKIES AND THE HOLIDAYS


Traditions. Come December, they are blissfully unavoidable. One of my all-time favorite traditions during the holiday season revolves squarely around cookies.

Baking them. Exchanging them. Delivering them. Eating them.

As a kid, my friends and I would gather in the kitchen at a cozy farmhouse up on top of a very big hill. We would bake dozens upon dozens of cookies, all while eating our healthy share of dough and giggling our way through sugar-high versions of our favorite Christmas carols and hymns. Once cooled, the cookies would be packed up and delivered around our sleepy little town to those simply needing to know someone was thinking of them.

Today, cookie making is still an important part of my friendships during the holidays. While we no longer bake in that cozy farmhouse up on top of a very big hill, we still eat too much dough and laugh until we cry. Our generosity has evolved, though dropping off cookies still happens on occasion.

We at next summer hope your traditions continue this holiday season. And, for those of you without traditions, we hope you consider starting some of your very own. They are part of living a good life.

DREAMING OF A WHITE CHRISTMAS COOKIES
  1. Preheat the oven to 350 degrees.
  2. Mix 1 cup softened butter, 1 1/3 cups light brown sugar, 2 eggs and 1 teaspoon vanilla extract.
  3. To the mixture, stir in 1 1/2 cups of all-purpose flour, 1 teaspoon baking soda, 1 teaspoon ground cinnamon and 1/2 teaspoon salt.
  4. Mix in 3 cups rolled oats and 2 cups of white chocolate chips (Hello, White Christmas!)
  5. Spoon equal sized bits of dough on a parchment-lined baking sheet and bake for 10 – 12 minutes.
  6. Eat one… or two, but save some to share with friends and neighbors. And don't forget to bring in a few for us to try as well. 


Tuesday, December 4, 2012

The Butler's gotta drink too


Lindsay and I have been doing a lot of work on our home. We've promised to show you as we updated and . . .well, the updates have been few and far between. It's not that we haven't done anything. On the contrary, we've done a lot, but until recently, we hadn't completed much. We've finally completed our "Butler's Pantry" - well, at least that's what Lindsay's mom, a Southern Belle through and through, calls it. 

Here's the Before picture. 


I really like this one, mostly because Izzy is in it, so I couldn't resist. As you can tell, it's less of a "before" picture and more of a "during" picture, but you get the idea.


I've included this picture to show you just how bad the floor was. The unfortunate thing is that neither photograph shows just how bad the wall color was. 

So here are the "after" photographs. The project broke down into four phases, 1) doors; 2) painting; 3) counter; and 4) carpet. This picture below is a "panoramic" shot that I took to show the overall view. No, our walls are not bowed in real life. 


The first thing we did was remove those doors to open the cabinets up. Then we painted the walls a light grey color which made the white trim stand out more. After that we painted the interior of the cabinets a hot pink that was a perfect background to our bar accessories.


 We then had to get rid of that horrible countertop. Putting in soapstone, slate, or quartz counters was not in our budget for this little space, so Lindsay came up with an ingenious solution. She decided to get a mirror cut to the exact dimensions of our countertop. We just fit that in over the old linoleum counters and it instantly transformed the space. To finish the counter's front we bought an inexpensive piece of molding, gave it a high quality glossy finish, and glued it to the front of the counter. 


Finally, we covered that terrible floor with Flor carpet tiles to match the back of the cabinets. This gives the overall space a more modern and sophisticated lounge feel. We love it. Hope you do too!


Thursday, November 1, 2012

Happy Birthday Izzy


This past week was our dog, Izzy's, third birthday. Since we think of her as a member of the family, we had to celebrate. Lindsay gave Izzy a real treat - a dog cake. We've included the recipe below. 
You'll need the following:


  1. Preheat oven to 350 degrees F (175 degrees C). Grease a 6 cup ring mold.
  2. Combine the egg, peanut butter, oil, vanilla, and honey, if desired, in a large bowl; blend well. Stir in the carrots and mix thoroughly. Sift together the flour and baking soda and fold into the carrot mixture. Spoon cake batter into prepared pan.
  3. Bake in preheated oven for 40 minutes. Let cake cool in pan for 10 minutes; then turn out onto a wire rack to cool completely.
You'll notice in the picture below we made a few changes. the letters on Izzy's cake were made with one of her favorites - Beggin' Strips! 


As you can tell, she seemed to like it. And if you come by our house for dinner, don't worry, that's Izzy's plate. You won't be served on it. Besides, she licked it clean. 


Monday, October 15, 2012

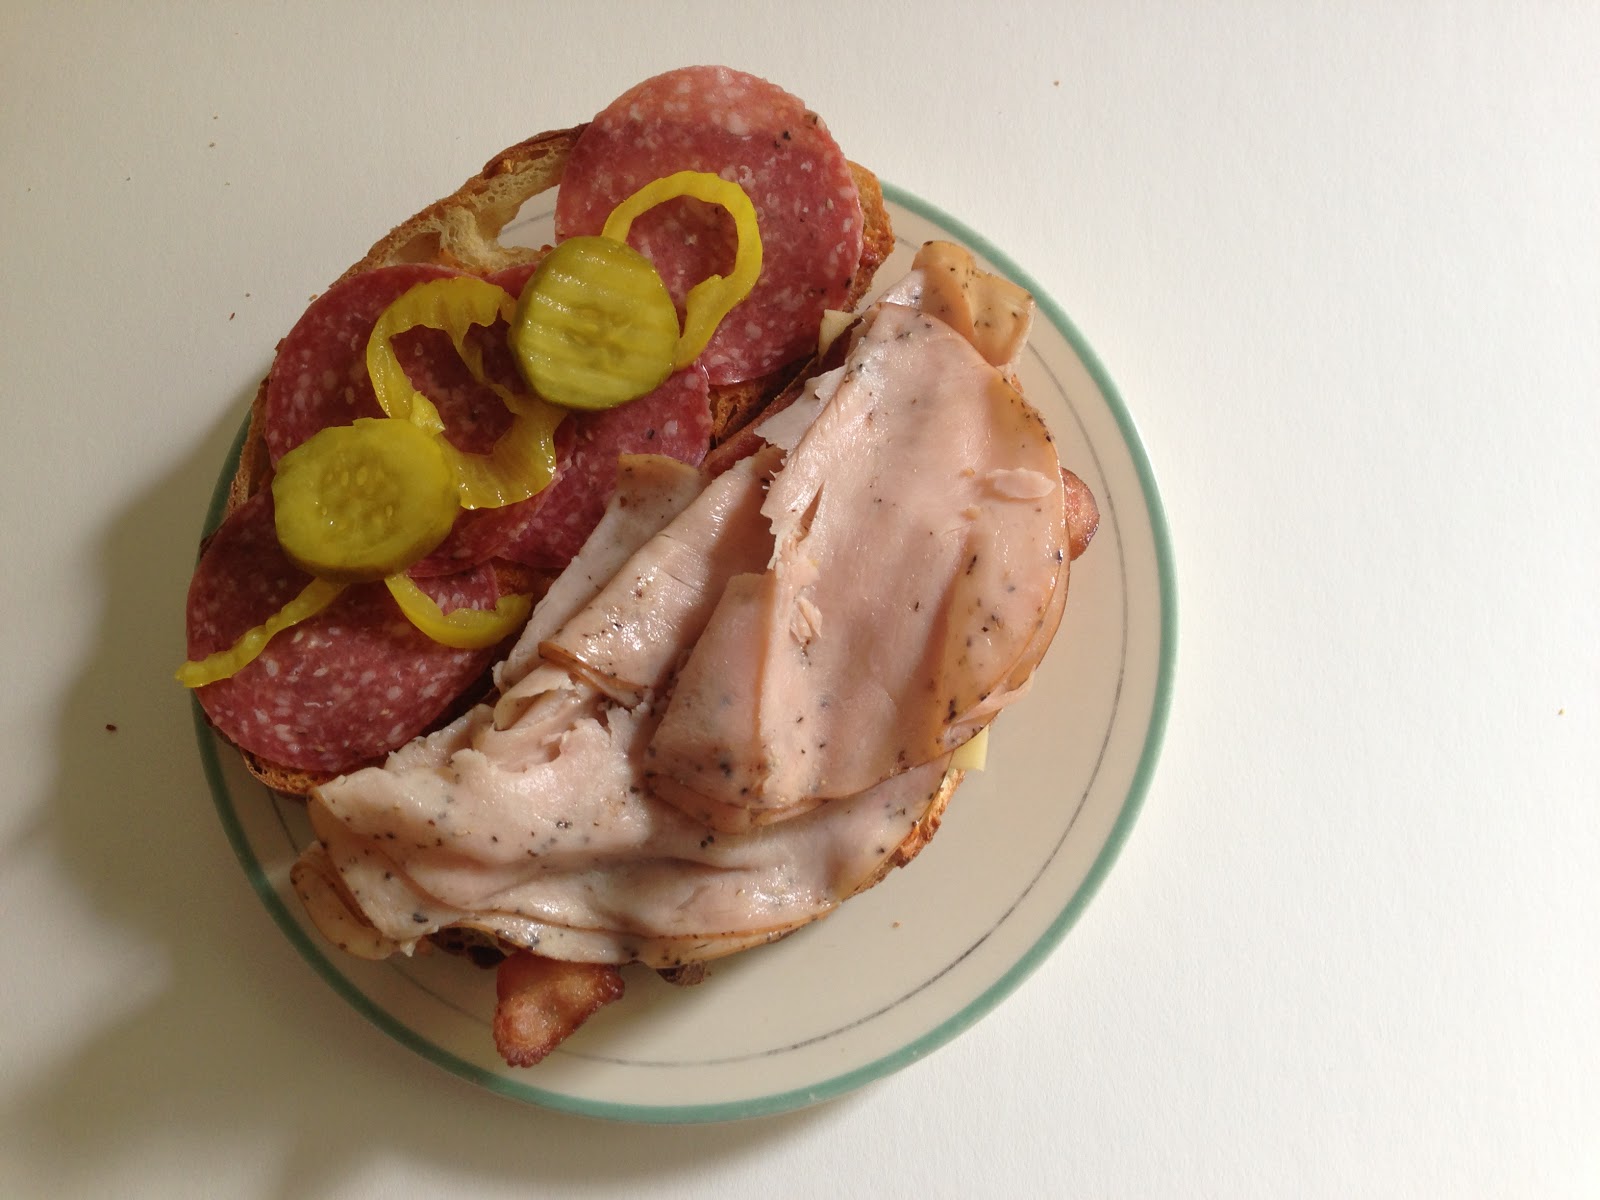
Construction of the Perfect Sandwich


                           1. Rock Hill Bakery jalapeño cheddar bread
                           2. chipotle mustard
                           3. bacon
                           4. cheddar jack cheese
                           5. dry salami
                           6. cracked pepper turkey breast
                           7. dill pickle chips
                           8. spicy pepperoncini

Here's the most important part - the construction. Start by toasting the bread. This gives the bread some heat. Immediately, after pulling the bread from the toaster place the cheese on the warm toast. This will cause the cheese to quickly warm up and begin to melt into the bread. This cheese layer serves multiple purposes: 1. it covers any holes in the toast; and 2. it protects the toast from any wet elements in the sandwich which would dampen the bread.


Next, add the cooked bacon. Hopefully, if this is done quickly enough, it will melt slightly into the cheese and bond with that half of the sandwich. 


Next, you have to add the mustard to the other slice of bread. Try not to add too much (which could dampen the bread, or worse, flow out of the holes in the bread), but make sure you've covered the entire slice of bread. 


Once the mustard had been added, you need to cover that slice of bread with the dry salami. Like the cheese, this will cover any holes and it will protect the bread from any more moisture. This is especially important because of the next step. 


The spicy, but damp pickles and peppers are added next. It's important that each of these should be shaken to remove any extra moisture before placing them on the sandwich. 


Finally, the turkey is placed on top of the bacon. The turkey now acts as a barrier between the bacon and the peppers and pickles. This ensures that the bacon and toast remain crispy, acting as a textural foil to the soft salami and turkey. 


Anyone who has tried this sandwich knows that, when properly constructed, it becomes an element of a truly good life. 


Saturday, June 23, 2012

Painted Furniture

We haven't posted in a while because we've been busy getting both stores ready for the summer season.

We converted the back of our store into a work space where we have been painting furniture.  One of our projects included painting an old piano and a beautiful little table.  We posted a few weeks ago about our plans to paint them florescent pink and kelly green, and we now have pictures of the finished products!


We love the contrast of the bright, crisp colors with our floors in the Bolton Landing store.

Putting a fresh coat of paint on an old piece of furniture is one of the easiest ways to update your space.  Here are some of our favorite paint jobs that we've done around the stores:


With our new work space there will be more to come!  Stayed tuned . . . 


Tuesday, May 22, 2012

Feeling Inspired

Matthew and I have been painting like crazy to get ready for the opening of our Bolton Landing store this weekend.  After painting numerous display tables white, we're feeling like we need some color.


We have a few special pieces, one old piano and a little side table, which we would like to paint bright colors.  We're thinking neon pink for the piano.


I'm feeling inspired by this mixture of old and new.  It makes me think the 
old piano needs something as bold as a neon in order to update it.


I love how the pink serves as a focal point in the two images above.
The other color we're thinking about is kelly green for the little table.  
It feels perfect for our Bolton Landing store because the color screams summer.


And to top it off, it looks like these two colors work pretty well beside each other.  
We'll keep you posted on our painting projects.  
Stop by our Bolton store this weekend to see for yourself!